
Now that I'm over with obsessing about collecting rain water. I'll be addressing my worm compost bin. This was the first thing I started when I got into the house. I figured it was least expensive thing to start and something new to learn. Oh and it has tons of benefits.
I have to admit. I've been really lacking on taking care of my worm bin and making sure the worms are healthy and happy. So I may have to start from scratch and reattempt to do it right this time around.
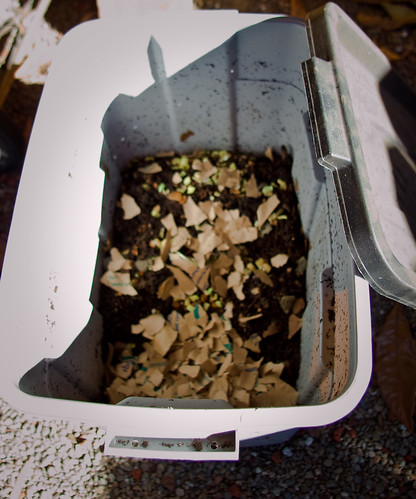
My first approach was with a 25 gallon Rubbermaid tub. It is solid in color with a lid. I drilled a bunch of small holes in the lid for air flow and a few small ones on the bottom for water drainage. I used a Dremel and bit to do this. The bits are tiny and don't allow flies and other unwanted pests to enter the bin. I also put some fly trap paper above it just in case. Though this method does work. It doesn't work for me or my garden situation. I would recommend this method if your keeping the bin in a garage. I experienced minor odor, but only when I neglected the bin for too long and the environment was out of balance. Otherwise, I haven't had any issues. I find worm composting the next easiest thing to do aside from collecting rain water.
A few simple rules to worm compost bins. You want to keep your worm bin out of direct sun light for long periods of time. Must have air flow and drainage. You have to create a environment for them, which we call, "Bedding." This can range in natural materials such as, peat moss, coconut coir (fibers), paper bags (shredded), garden/lawn clippings and dried leaves. There is a little science to this bedding. You just need to create a balance for the worms to survive in. Which ever bedding you choose. It needs to have a consistency of a damp sponge. You don't want to drown your worms. Which is why drainage is important.
So a while back. We had a week of great sunshine weather in January. My bin was kind of in a sunny part of the backyard. Well.... I roasted the shit outa my worms. Damn near killed em all. However, they breed like crazy. I had these little white translucent looking worms left. So I tried to revamp the life of my compost by putting them in a shady place and block the bin from direct sunlight.
I don't think I would have had as much of a issue had they not been in this Rubbermaid tub. If I had them in a wood container. The wood would have blocked out that heat for the most part. Rubbermaid tub is about 2mm thick. While a nice wood bin would be about 1-2" thick. And even if I had this wood container instead. In a area of the garden that got early morning light, but shaded by afternoon. I'd be in far better shape. So this is going to be the route I take next.
I was thinking about building my own wood compost bin. But I've been digging online for premade bins. I think the cost for materials and time consumed constructing a bin out weights buying one made. I've been tight on time lately. So this is going to be one of those things I cheat on by not making it myself. I'm not sure yet. I kinda feel like I'm cheating by not making it myself. We'll see.
Here are a few links for worm composting. Read through the sites. Use google to search for unanswered questions. You can also hit me up and I can help you out as well. Oh and if you live in a apartment. You can compost without it getting all nasty. This is where a premade bin will work in your favor.
1) http://www.one20farm.com/index.html
2) http://www.mamaswormcomposting.com/
3) http://www.sonomavalleyworms.com/Sonoma_Valley_Worms/Sonoma_Valley_Worm_Farm.html